
August 9th, 2007 by alephnaught
Paper model of Chartres Cathedral – IT’S DONE!
I bought a model to assemble of the famous Chartres Cathedral in the Cathedral gift shop, and this entry will track how I put it together.
The model is large, at least 2 1/2 feed long and a foot or so wide. Its pretty complex with a lot of little parts (mostly the flying buttresses), but the instructions are clear and pretty easy to work through.
For a project like this, you need a sharp hobby knife, a good white glue stick, some wax paper and some round toothpicks. At some points tweezers helped out.
Below is a photo journal of the construction – I hope you find it interesting!

The core of the Cathedral glued to the base. That’s a foot ruler bottom-left

A view from the front – partial south tower installed August 5, 2007

South tower finished with the foot ruler to indicate the height

A front view with completed south tower August 7, 2007

Front view with completed north tower (those buttresses were not fun!) August 9, 2007

The north transept completed August 15, 2007

The north transept completed August 15, 2007

The south transept completed August 18, 2007. Note that the south transept has more decoration and higher higher roofs on the towers; I wonder which was built earlier…. The model is really starting to shape up; the last things are the rear (which looks difficult – lots of curved paper to cut and glue) and the flying buttresses.

The south transept completed August 18, 2007. Note that the south transept has more decoration and higher higher roofs on the towers; I wonder which was built earlier…. The model is really starting to shape up; the last things are the rear (which looks difficult – lots of curved paper to cut and glue) and the flying buttresses.

The chevet, or rear of the cathedral August 22, 2007. Now comes the really fun part, cutting out all the complex curves of the flying buttresses and gluing them in. But, then this model will be done.

The chevet, or rear of the cathedral August 22, 2007. Now comes the really fun part, cutting out all the complex curves of the flying buttresses and gluing them in. But, then this model will be done.

The chevet, or rear of the cathedral August 22, 2007. Now comes the really fun part, cutting out all the complex curves of the flying buttresses and gluing them in. But, then this model will be done.

And the first set of butresses are installed on the rear of the cathedral August 27, 2007.

And the first set of butresses are installed on the rear of the cathedral August 27, 2007.

A couple of detail shots to show the butresses – very neat! Almost looks like an Escher print!

A couple of detail shots to show the butresses – very neat! Almost looks like an Escher print!

And the rear is completed (note the copyright message) August 28, 2007

And the rear is completed (note the copyright message) August 28, 2007

And the rear is completed (note the copyright message) August 28, 2007

I finished the side buttresses yesterday late afternoon September 3, 2007

I finished the side buttresses yesterday late afternoon September 3, 2007

I finished the side buttresses yesterday late afternoon September 3, 2007

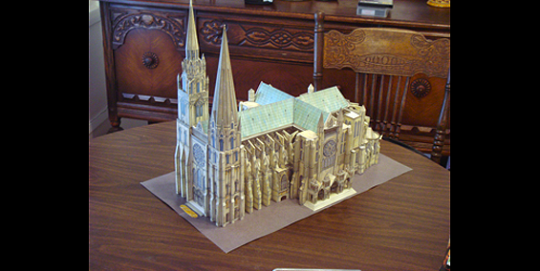
Some general views of the completed model

Some general views of the completed model

Some general views of the completed model
Its hard to believe its done! It took a month to assemble this, but it wasn’t too hard; developing a technique for cutting and gluing along with being slow and careful were the keys to success. The kit came with photos and text about Chartres – you can find the material here.
Epilogue: We moved to Los Angeles; the movers packed the model in a big box with lots of paper around it. AND IT MADE IT FINE! I had to re-glue one spire and a couple flying butresses and flatten the base, but otherwise it came through well. It’s in a place of honor in our dining room on top of a large bookshelf!
Revisions:
There are no revisions for this post.
28 Comments
Leave a Reply


-

+Bob Hays
- I'm a father and husband, have two schipperkes, like to read, compose music, travel. And I manage a couple software development teams at DIRECTV.

5:01 am on July 27th, 2018
After I originally left a comment I appear to have clicked the -Notify me when new comments are added- checkbox and from
now on whenever a comment is added I receive 4 emails with
the exact same comment. Perhaps there is a means you are
able to remove me from that service? Thanks!
Translate
5:59 am on July 27th, 2018
This is the only comment I find on this site with this email address.
Translate
7:39 pm on October 10th, 2019
Hello! I really like the model you’ve done, I’ve searched for it for so long, and to find the assembly so really hard. You can guide the placement I buy it? Looking forward to hearing from you!
Translate